Your Arms and Abs Will Transform After This 2-Week Challenge Image Source: POPSUGAR Photography
← Use Arrows Keys →
Plank is one of the most effective total-body moves, so here's a new challenge for you to conquer — a five-minute plank. Since holding a straight-up plank wouldn't be any fun (and could end up causing an injury), this challenge mixes up five basic variations to not only tone your abs and arms, but to target the obliques, legs, and upper back as well. Here's an explanation of how to do each one, followed by the two-week plan.
Original article and pictures take media1.popsugar-assets.com site
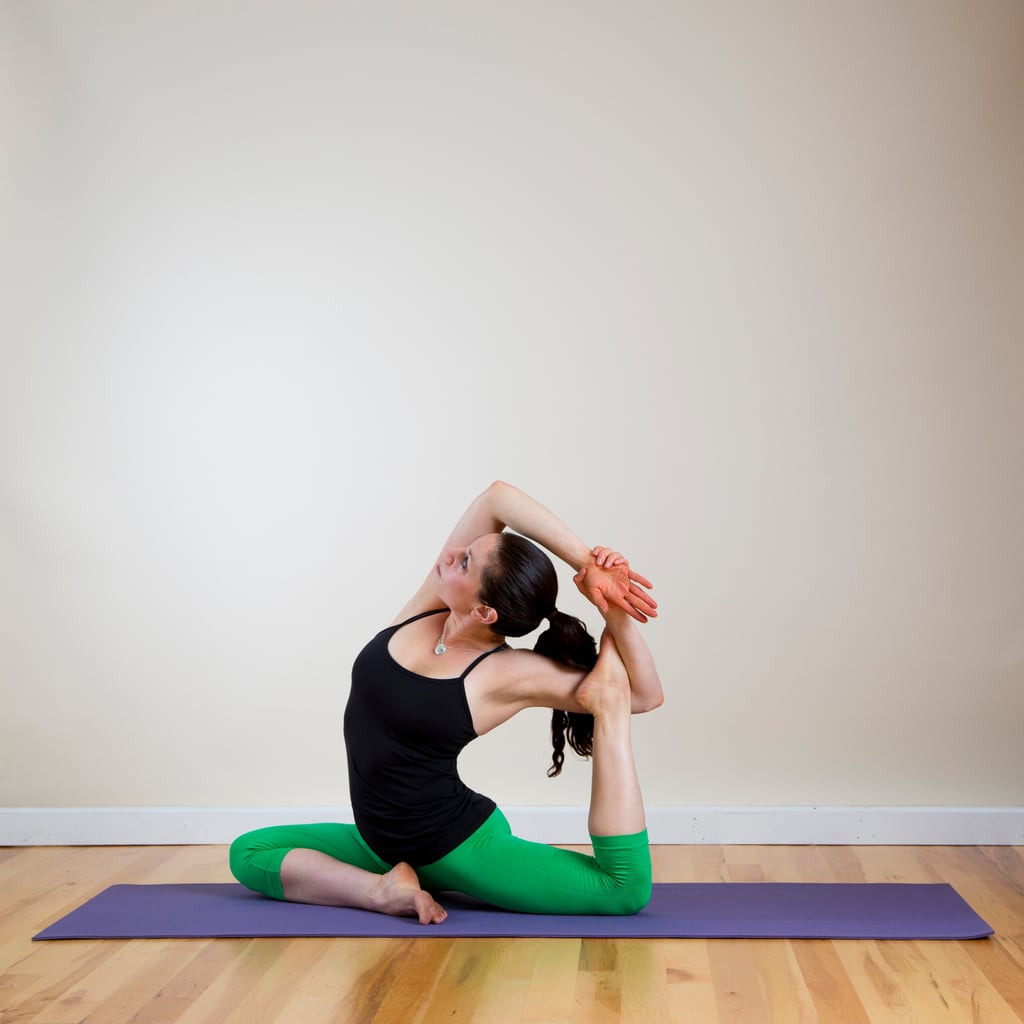
You'll Want to Unroll Your Mat For This Happy Hips Yoga Sequence
Runners and the deskbound, rejoice! Your tight hips will soon feel more open and relaxed. Just step onto your yoga mat or even the floor next to your computer and move through this 16-pose, hip-opening sequence.
Are you ready World? In the next few years, you are going to be hearing more and more about the health benefits of the squat. Just like the barefoot movement I blogged about yesterday, the “squat movement” is going to happen in a big way, once everyone realizes that your Pelvic Floor, Hip, and Knee health require regular squatting.
If you haven’t squatted in the last million years (besides the two times you went camping and peed on your shoe), it’s going to take awhile to prepare your joints. Be patient, it’s worth it. Those of you with knee and hip replacements or other contraindications should stick to the first few “prep” exercises and avoid the weight bearing squat. Artificial equipment is not designed to have the same ranges of motion as real joints nor can some surgical repairs take the downward pressures created by straining muscles. Bummer, I know. (But to stave off surgeries of the hips and knees, etc. start this program now!)
To help you, I’ve created a step-by-step “preparing your body to squat program” you can begin right now. All you need is a yoga mat, or thick towel blanket. Let’s go!
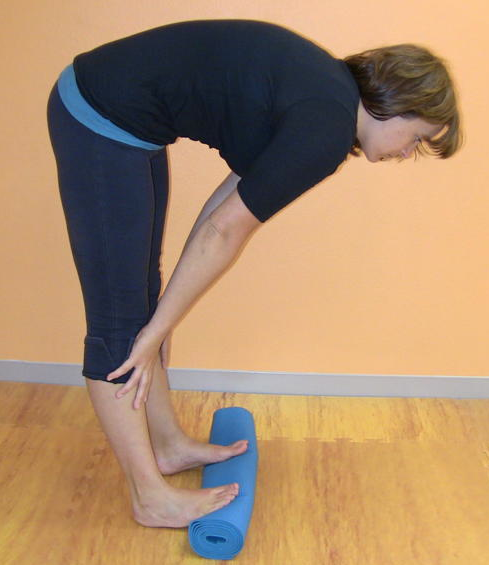
Place your one foot up on a rolled yoga mat, keeping your heel on the ground. Step forward with the opposite foot to stretch the back calf.
Picture 17
Now step up with both feet and try to lift you tailbone until it looks less like this picture:
Picture 28
And more like this one below. See the little curve at my low back? This is an indication of an un-tucked, pelvis. If your tailbone slopes down, as in the first picture, your too-tight hamstrings are preventing natural pelvic floor and glute strength from developing.
Picture 27
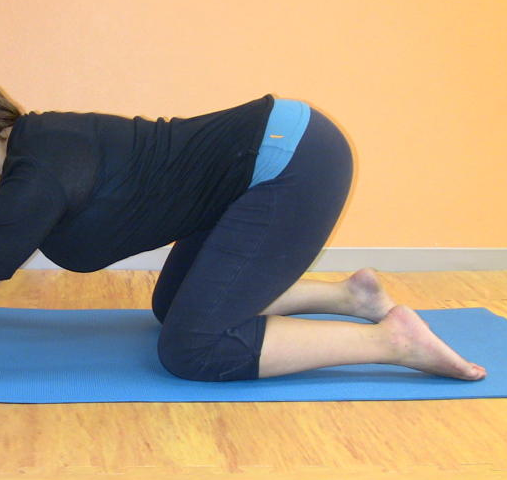
If you’re a chair-sitter, you should spend 5-10 minutes running through the first two exercises. They are great for preparing your joints for full flexion (bending all the way). After you’ve warmed up the back of the calves and hamstrings with a little stretching, it’s time to get down onto your hands and knees.
It is very important that your lower legs and feet track straight back, and are parallel to each other.
Picture 20
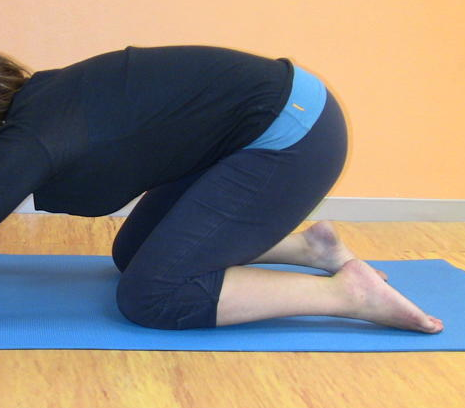
Now, from the hands and knee position, drop the hips back as far as you can, without allowing the feet to move closer to each other or allowing the tailbone to tuck under.
Picture 19
Ooops! Too far! See how the pelvis tucked in the picture below? Don’t sit back any farther if your tailbone tucks. This forces your lower back into flexion — not what we want for a pelvic-floor loading squat. Instead, come forward, re-lift your bum, and hang out in the position pictured above.
Picture 29
When your tailbone tucks, this clearly shows how TIGHT your hips have become! If you can’t sit back without tucking, it means that your hips are so stiff, they are preventing natural activity of the pelvic floor and gluteal muscle groups. Do this a few times a day until you can get back with your tailbone up.
You may also see how we are getting the body in the same position as a deeper squat without the loads. It is better to improve range of motion before you throw all your body weight onto tight joints.
Other fun squatting tips…
If your tailbone is tucking when you sit back, it means that instead of peeing (or other things) in a downward motion, you are actually doing them in a forward motion. So that’s why you pee all over your shoes. Maybe you shouldn’t joint the barefoot movement until you’ve mastered the squatting one. Just sayin’.
Now that you’ve been sitting back, it’s time to make your feet move into their squatting position. Tuck your toes under and try to get your feet perpendicular to the ground.
Picture 30
Spend some time stretching your feet while sitting back (aaaaand lifting your tailbone!)
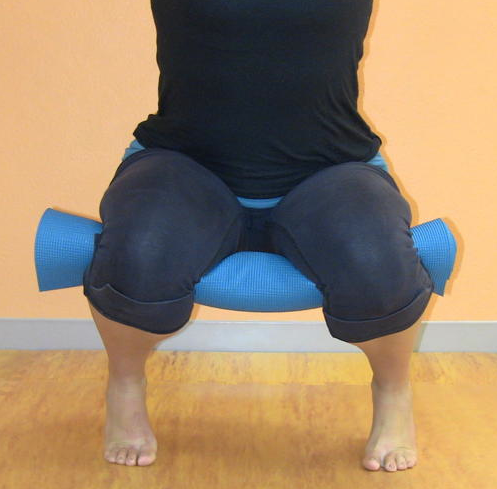
Now it’s time to start bearing your body weight. The strength needed in a squat is not only getting down and lifting up, but also the strength in the lower legs to stabilize the ankles. Your lower leg muscles will usually fatigue first! To keep squats safer for your knees and hips, you should keep the alignment of the lower leg and feet. The feet should point forward, they should be placed just slightly wider than the pelvis, and the knees should not be wider or more narrow that the feet.
When you first squat, super tight quads and psoas can increase the pressure in the knees. In addition to the squat-prep exercises, give yourself additional joint space by placing the rolled yoga mat behind the knees.
Picture 31
Try to both untuck the pelvis as well as lower the heels toward the ground. Hold onto something when you first start, if you’re feeling wobbly!
Check that your feet and knees are still aligned well…
Picture 25
and they haven’t twisted (see how my right thigh and foot pokes out?) and your weight hasn’t shifted to favor one side. Not good for your joints.
Picture 18
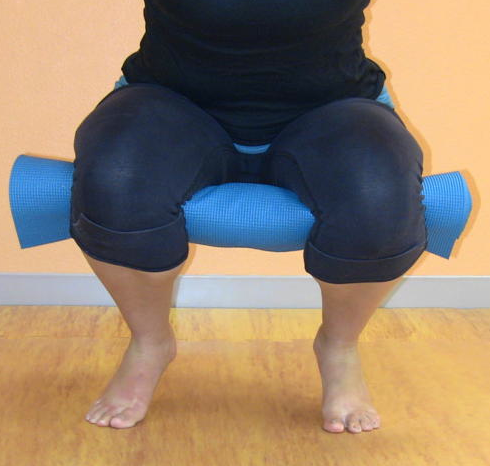
After the ankles and lower leg have had a chance to stretch and strengthen, prop your feet up with the rolled yoga mat and gently allow your knees to bend their full range. Again, it’s very important that your lumbar spine (the concavity at the lower back) maintain its curve.
You’re ready to go camping now!
Picture 24
Don’t let this person borrow your shoes…
Picture 32
Eventually you will be able to maintain the curve in your low back (pelvis position,check!) and get your heels on the ground (foot health…check!). Until then, use this program as the ultimate total-leg, pelvic floor workout. Progress through these exercises as you feel comfortable, giving yourself plenty of time (which can be weeks and months even!). I also like to turn these moves into an hour-long lower body conditioning session when I’m feeling spunky.
And if you’re really bored, you can print out all of these pictures and make a flip book of me squatting. Now there’s fun for the whole family.
{Updates: For more squatting information and squat FAQs, please check out my most recent squat post You (Still) Don’t Know Squat.}
Are you still interested in learning more on this?
Many of us suffer from tight hips and hamstrings. This sequence of yoga poses will work to loosen up your muscles and stretch out those extremely tight areas. It is said that we hold a lot of negative energy in our hips and hamstrings. Opening up these areas is a great way to release that negativity. This will help to uplift your body, mind and spirit.
This post contains some affiliate links
Benefits of Stretching Your Hips & Hamstrings
Decrease Risk For Injury
Yoga that stretches out your hips and hamstrings helps to decrease the risk of injury, especially for runners and other athletes. When these areas of our body are opened it decreases strain on other areas of your body, especially the back and knees.
Decrease Aches & Pains
A common source of lower back pain is from tight hamstrings. Work on stretching out these areas daily. If you are consistent with your practice you will notice how your aches and pains gradually begin to disappear.
Improved Posture
Many of us unfortunately spend most of our day sitting. This leads to tight joints and muscles, and contributes to poor posture. Yoga works wonders for improving both flexibility and the strength of your postural muscles. This will allow you to both sit and stand taller with improved posture.
Yoga Sequence For Tight Hips & Hamstrings
Here are some great hip openers and hamstring stretching yoga poses that you can try. Try to hold each pose for about a minute or two to allow your muscles to release. Don’t forget to really breathe into the pose. If you feel that you cannot breathe while in any of the poses, then that is a sign that you need to pull back. Listen to your body and do what feels good for you. The point of these poses are to make you feel good, not strained. Just be patient and over time you will begin to see how your body will release and become more flexible.
FYI: Many of these poses are one sided, so don’t forget to repeat the pose on the other side.
Crescent Lunge
Reach your arms up with your shoulders relaxed. Step the back leg out behind you. Bend the front leg so that your knee is right on top of your ankle. Be sure that your knee does not bend forward over the ankle, as this will put strain on your knee. If you are having trouble balancing, move your back leg out to the side, away from your body to widen your stance. Keep your hips and pelvis level and squared off to the front of your mat.
Warrior II
Keep your front knee stacked right on top of your front foot. Take your back leg and turn your foot to the side. The middle of your back foot should be in line with the heel of your front foot. Keep your hips and pelvis leveled and facing to the side of your mat. Arms are out wide with your shoulders relaxed. Gaze right out over the middle finger of your front hand.
Reverse Warrior
From your warrior II posture, reach your front arm over your head and reach your back arm down your back leg. You will feel this stretch not only in your hips but up your side body as well.
Triangle Pose
From your warrior II posture, reach your front arm down so that your front hand is in line with the middle of your front foot. If this puts too much strain of your body, try placing a yoga block right in the middle of your front foot and reach down for that. Your back arm will reach straight up to the sky. For more of a balance challenge, turn your head to look up at your top hand.
Runner’s Lunge
Front knee is bent and stacked right on top of your front ankle. Your back leg stretches out long behind you. Both arms are placed on the inside of your front leg. If this stretch is too much, try bending the back leg so that it is resting on the mat.
Lizard Pose
Stay in your runner’s lunge, but allow that top knee and foot to fall away from your body. You will feel a nice stretch in your hip when you do this. If you need more of a stretch, bend your arms and rest your body onto your forearms. If you want to make the stretch easier, you can bend your back leg to rest on the mat and/or place your hands on a yoga block.
Pigeon
Bring your front leg into a 90 degree angle in front of you. Try to keep this angle as much as possible as you reach your back leg out towards the back of the mat. Keep your hips level and facing toward the top of the mat as much as possible. You may want to place a yoga block under that front hip if you are having trouble keeping your hips in line. For a deeper stretch, bend forward to rest on your forearms.
Figure 4
This is a modification for the pigeon posture. Start by laying on your back. Place your right ankle on top of your left knee. Bend that left leg up to a 90 degree angle. Keep your right foot flexed to protect your knee. Reach your arms through your legs (underneath that top leg) to grab onto the back of your left leg. For a deeper stretch press your right foot against your left leg as you use your arms to pull the left leg forward. Repeat on the other side.
Double Pigeon
From your pigeon posture, swing your back leg forward and stack it right on top of your front leg, keeping both legs at a 90 degree angle. Keep both sides of your seat planted firmly on the mat. For a deeper stretch you can press down on the top leg or reach forward with both arms. I find that this stretch is difficult when you are first starting out. As you can tell from the picture, I still cannot stretch my top leg all the way down to meet my bottom leg. Be patient with this stretch and don’t push your body too far.
Bound Angle Pose AKA Butterfly
Bend both knees out to the side and place the bottoms of both feet together. Reach your legs out to the side as much as your body allows. For a deeper stretch, fold the top of your body forward over your legs.
Reclined Bound Angle Pose
From your butterfly posture, lower your upper body back on to the mat. Keep the bottoms of your feet glued together and allow your knees to fall out to the side. This is a very nice restorative posture. You can stay here as long as you’d like, allowing yourself to breathe into the stretch.
Reverse Butterfly
Lay on your back. Cross your legs. Bring your legs up toward the sky. Grab on to your shins or ankles and stretch your legs gently up and in the opposite directions. Repeat on both sides.
Bridge Pose
Lay on your back. Plant your feet hip width apart, right under your knees. Push off of your feet and lift your hips up toward the sky.
Happy Baby
Lay on your back. Bend your legs, bringing your knees up towards your chest. Grab onto the outsides of your feet and gently stretch your hips out. It also feels good to rock your body side to side while in this posture.
Frog Pose
Frog pose is like a middle split with your knees bent. Both knees are bent in at a 90 degree angle with your feet flexed out. Your knees, thighs and seat are all in one straight line. Think of your lower half as being in a goal post position, where your upper body is the base of the pole. Bend forward and rest the top of your body on your forearms.
Mermaid Pose
Bend your top leg into your body. Bend your back leg up towards the sky. You can either grab onto your back foot to pull it up or place it in the crevice of your arm. As you become more flexible in this position you can practice reaching your front arm back to bind it with your arm that’s hooked onto your leg. Try to keep your hips as level and squared to front as possible. For a deep stretch, try to keep that front leg at a complete 90 degree angle, like you would have it in the pigeon pose.
Upward Facing Dog
Lay on your stomach with your leg out long toward the back of the mat. Keep your thighs, shins and the tops of your feet facing down toward the mat. Place your hands right underneath your underarm area. Use your arms to lift your upper body, chest high and open, back extended. Try to relax your shoulder down your back.
Downward Facing Dog
From your upward facing dog, curl the toes under moving through a plank position and then into your downward facing dog. Your seat is lifted high up towards the sky. Spread your fingers out wide on your mat. Extend your shoulders, while keeping your core engaged and your back in a neutral position. Your legs are extended straight as you try to push your heels toward the ground.
Rag Doll
From your down dog, walk your hands in towards your feet. This moves you into your forward fold. Be sure that you are bending forward from your hips, and not your back. Allow your upper body to hang heavy. Fold your arms together and gently sway your upper body side to side.
Forward Fold
For a deeper hamstring stretch, reach your hands all the way down to your mat. You can either grab onto your big toes with two fingers or slide your hands underneath your feet.
Wide Legged Forward Fold
To move into a wide legged forward fold, step your feet wide apart on your mat. Be sure that both of your feet are facing forward. With a straight back, gently fold forward. Lower your head towards the floor and place your hands on the matt. For a deeper stretch, wrap your hands around the back of your ankles to pull your body into the stretch a little bit more. Try to get your forehead as close to the mat as possible.
If you are consistent with your Yoga practice you will begin to notice a major change in your body. Yoga has so many health benefits, both physically and mentally. I hope this sequence helps to open up your hips, stretch out your hamstrings, improve your posture, release negative energy and to prevent injuries. A little bit of Yoga truly does go a long way in improving your activities of daily living.
If you suffer from neck or back pain, you can check out this post for another great yoga sequence.
Yoga Questions Answered Pin it! Ask your yoga questions on twitter using hashtag #yogaquestion, on the yogabycandace Facebook wall, or submit your question here.
What should I do about my hyper-mobile hip joints?
Question 1: I have hyper-mobile hips, and as a result the joints are rather unstable. Balancing on one leg is very difficult for me, though I have no problem with arm balances. I know that continuing to strengthen the muscles around the joints will be beneficial, but are there any poses in particular that would help improve hip joint stability and balance?
Answer 1: People with hyper-mobile joints almost have it more difficult than those without because they are usually able to do all the athletic poses without too much effort, but the problem is that the hyper-mobile joints can cause injury. The challenge, then, for these people, is to tune in to the subtle body. No matter what pose you're in, scan your body beginning with the foundation, which is usually the feet. Always visualize a suction in the middle of the feet. This helps to engage the muscles and from there it's kind of a domino effect. The ankles will activate, the calf muscles, the thighs, the pelvic floor with lift, the abdominals will engage, etc. Follow the muscles up your body as you mentally scan and try to keep things light and lifted and engaged. For the joints where you're hyper-mobile, try to keep a little micro bend, and avoid locking the joints.
Like you said, it's really important to strengthen the muscles around the joints, and there are definitely yoga poses that will help like this sequence for legs and butt , and this sequence is great for improving balance. But the most beneficial thing, in my opinion, is tuning into the more subtle aspects of the practice as outlined above.
Pin it! Pincha mayurasana (forearm stand)
How do I know when to take my practice to the next level?
Question 2: Hi there! I'm unsure of how to know if it's time to take my practice to the next level or not. I'd like to eventually have a daily practice and maybe even teach someday. Lately I have been going to a mixed level class every other day and in that class I have been trying to do the "challenging" variation of the pose if the instructor gives the option. I've been feeling good about it, and I am wondering if I should try going to the Yoga 1 class or the Power Vinyasa that is offered. I know that I should of course, listen to my body - I also know that I have no background in sports or such; because of that I'm not sure what qualifies as "pushing myself" or what is normal when one is trying to go deeper into a practice. I occasionally get a good shaking in my muscles as I hold a pose, but I've yet to experience the 'sweat to the point where I'm worried about slipping' as I have read about from some yoga people out there - does that mean I'm not pushing myself enough? Thanks so much for lending out your experience and insight to all of us! And for this beautiful and inspiring blog.
Answer 2: In order to move deeper, especially in a more athletic yoga practice, it's important to find your edge. It doesn't matter how much you sweat (some of us don't sweat much no matter how hard we work). Instead, what really matters is how the body feels. "The edge" is that sweet spot between the known and unknown. That sounds sort of flowery and vague so let me break it down. Imagine you're working on side crow pose. People new to the pose can keep the knees bent. People who have a stronger core and are ready to take it deeper can try straightening the legs. But how do you know when you're ready to do that? You know when the beginner version is second nature. When you know the pose inside and out. So you find your edge by moving your feet a little bit and beginning to straighten the legs. So my suggestion to you is to find your edge. If you feel comfortable in the classes you're in and there is an option for a more challenging class, give it a try. The very fact that you're doing all this introspective work and trying to figure out what's best means you're already on the right path. :)
Pin it! Supported bridge pose - a great restorative pose
What poses should I do to stretch my stomach, keeping in mind that I have lordosis (swayback)?
Question 3: I have swayback (lordosis) and some yoga moves are very bad for that. I have just been diagnosed with stage 3 endometriosis which means I have adhesions as well as the endo spots. I had removal surgery in January, and now I am starting to feel the pains of the internal scars and adhesions being built back up. I have found there are yoga poses that help stretch the stomach area to expand and hopefully break up the scar tissue. The only problem is some of the poses make the swayback worse. Can you please tell me which ones would be gentle enough for both of my problems? Thank you so very much.
Answer 3: I think you might benefit from low lunge, gently pressing the pelvis forward (look at the first picture), and supported bridge post shown above. You'll need a yoga block for supported bridge pose. Place the block directly underneath the back of the pelvis so your tail bone is long.No matter what yoga pose you do, keep the alignment of the pelvis in mind. For lordosis, the pelvis is tilted forward, so visualize the tailbone lengthening down toward the heels of the feet. This will lengthen the low back, bringing it more into a long line rather than a backward letter C. Hope that helps you!
My hips cramp up when I do boat pose, what should I do?
Question 4: I love reading your blog - thank you for sharing :) I do yoga at home somewhere between 1 and 4 hours a week. I also run around 30 km a week, and I have tight hips and hamstrings. I find that I tend to get cramps in my hips, when I do poses that require strength there (especially boat pose). A lot of the poses that work the abdominals make my hips cramp. I don´t consider my hips very tight, I think my real problem area is the hamstrings. I enjoy all the poses that stretch the hips. And I have spent a lot of energy on variations of bridge pose to strengthen the pelvic floor (three child births, only one went easily), which I think has improved my strength in that area. Do you have any advice on how to avoid this cramping in the hip during poses like boat or build up more strength in the area?
Answer 4: Hmm, if you're cramping in the hip flexor in boat pose and other poses that work the abdominals, I think it might be worth looking into strengthening the hip flexors and lower abdominals. Above are two poses you can try. Breathe 5-7 breaths in each pose, and try not to lean back as you do them. Try to engage the core and use the strength of the abdominals and the hip flexors to left the leg. For working on core strength, I have a yoga for sculpted abs video, and if you're pressed for time you could try the (less than) 5 minute abs video. Until you build up the strength in the core and hip flexors, you can modify the boat pose by extending just one leg and keeping the toes of the other foot on the ground.
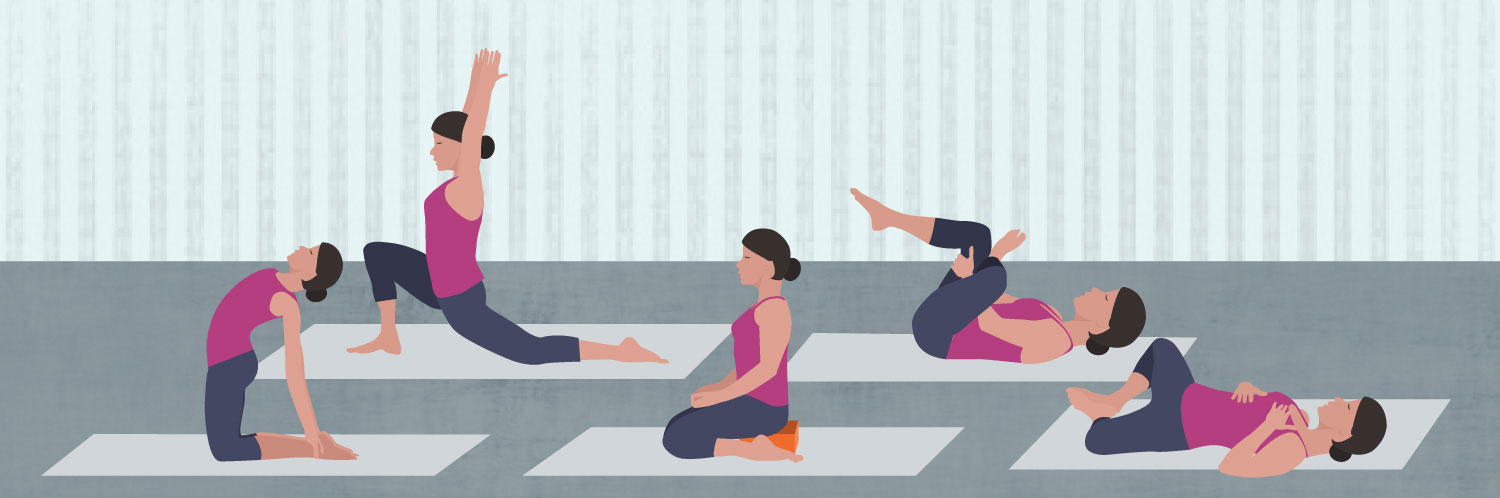
Did you know that the hips are made up of 17 muscles? These muscles provide stability and balance, and give us range of motion for almost all our daily activities. Not taking care of your hips can be detrimental to your health and create problems such as poor balance, lower back pain, misalignment in lumbar spine, and limited range of motion in the hips and lower back, to name a few.
But fear not! Incorporating 10 simple exercises into your daily routine can greatly reduce your risk of having hip problems. Start with happy baby pose. To begin, lie on your back on a mat and pull your knees to your chest. Place your hands on the outside of your feet, opening your knees wider than your torso. Press your feet into your hands and pull down. Hold this pose for 30 seconds, breathing deeply.
A yoga block is your best friend when doing hip exercises. Hero pose with a block for support is another great way to increase hip health. Kneel on a mat with thighs perpendicular to the floor and the tops of your feet facing down, placing your yoga block between your feet. Bring inner knees together and slide feet so they are slightly wider than your hips. Press the tops of your feet into the mat. Sit down on the block and use your hands to turn the top of thighs inward. Hold position for 30 seconds.
Strong hips can help prevent injuries and improve your quality of life. Try out these poses to loosen your hips and get moving!
Embed the article on your site Original article and pictures take www.fix.com site